This tutorial is divided in 4 parts: Scene setup, materials, lighting, and rendering. In the first part, we will set up the scene, create a base, and import our models, in the second part, we will be assigning materials and using Vray lights to light our scene, and in the last part, we will adjust the Vray settings for the final render.
Note: This is a lighting and rendering tutorial. You will need to supply your own model in order to follow along.
Click onWhere 3d product visualization is concerned, one of the most important techniques for achieving realistic high quality images, is your ability to create studio renders. In this detailed 4 part tutorial you will learn every step necessary to create your own high quality studio renders with Vray and 3ds Max.
This tutorial is divided in 4 parts: Scene setup, materials, lighting, and rendering. In the first part, we will set up the scene, create a base, and import our models, in the second part, we will be assigning materials and using Vray lights to light our scene, and in the last part, we will adjust the Vray settings for the final render.
Note: This is a lighting and rendering tutorial. You will need to supply your own model in order to follow along.
getting diffuse reflections.
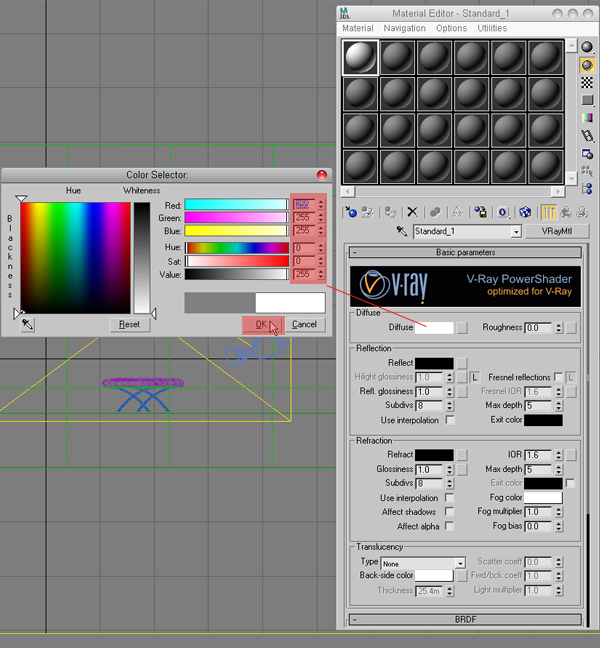
Diffuse – The diffuse color of the material.
Rougness – Can be used to simulate rough surfaces or surfaces covered with dust.
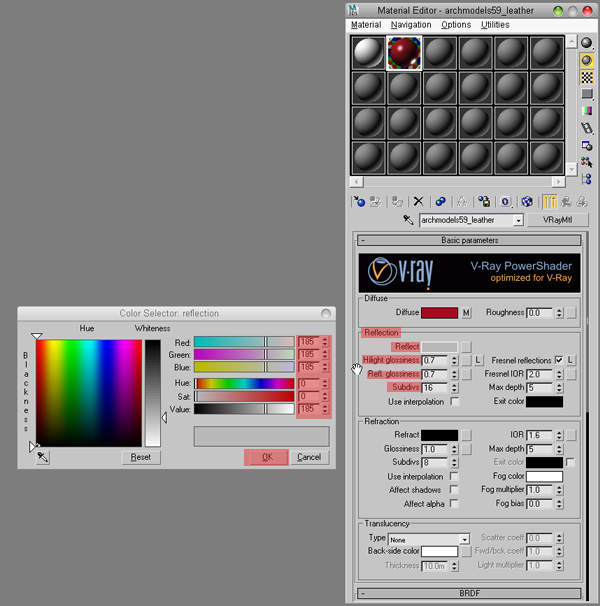
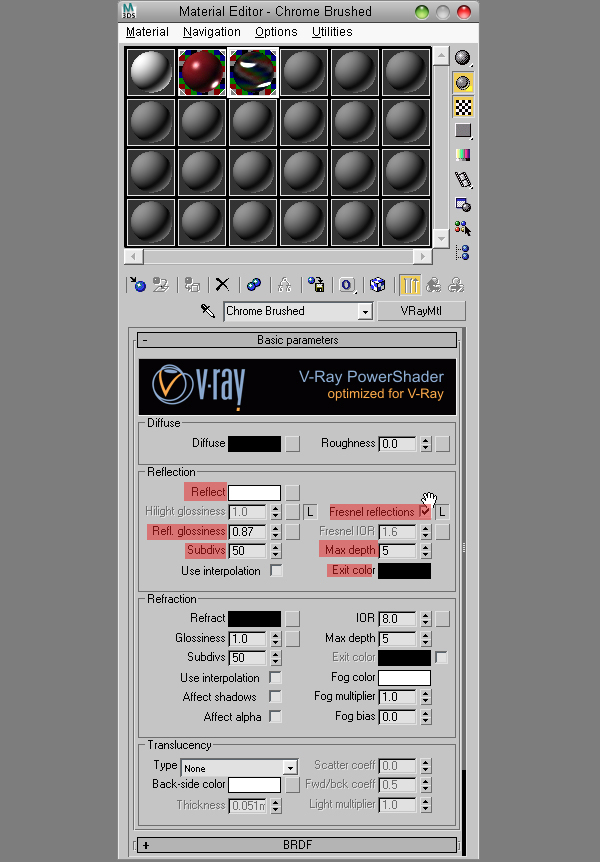
Reflect – The reflection color.
Reflection glossiness – Controls the sharpness of reflections. A value of 1.0 means perfect mirror-like reflections, while lower values produce blurry or glossy reflections. Use the Subdivs parameter to control the quality of the glossy reflections.
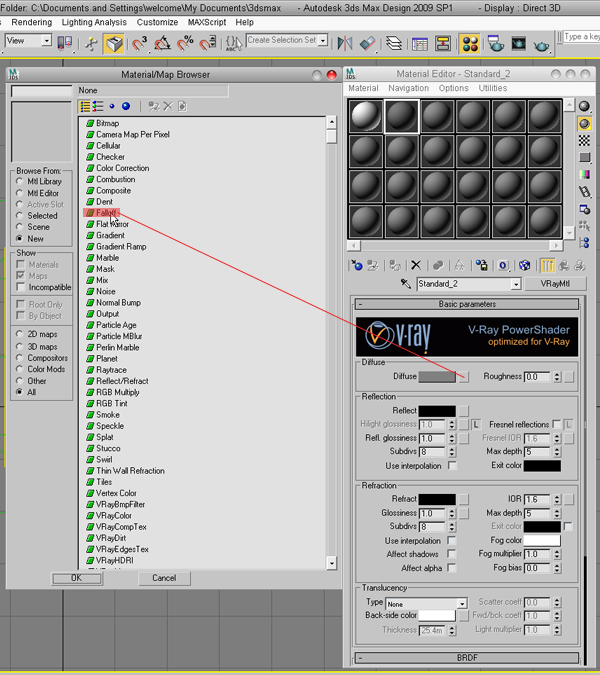
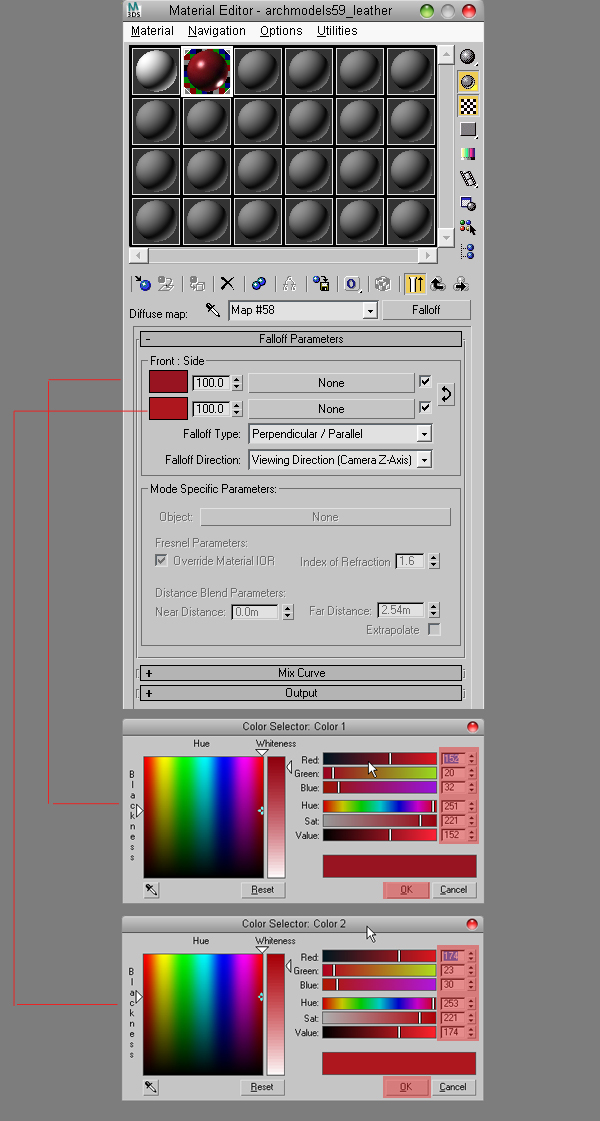
Apply a fall off map in the Diffuse slot (as you can see in the image). Also change the reflect color and bring down the reflect glossiness to .7 Apply this material to the cushion of the stool. Note: You will need to adjust the colors and various settings described to suit your own model.
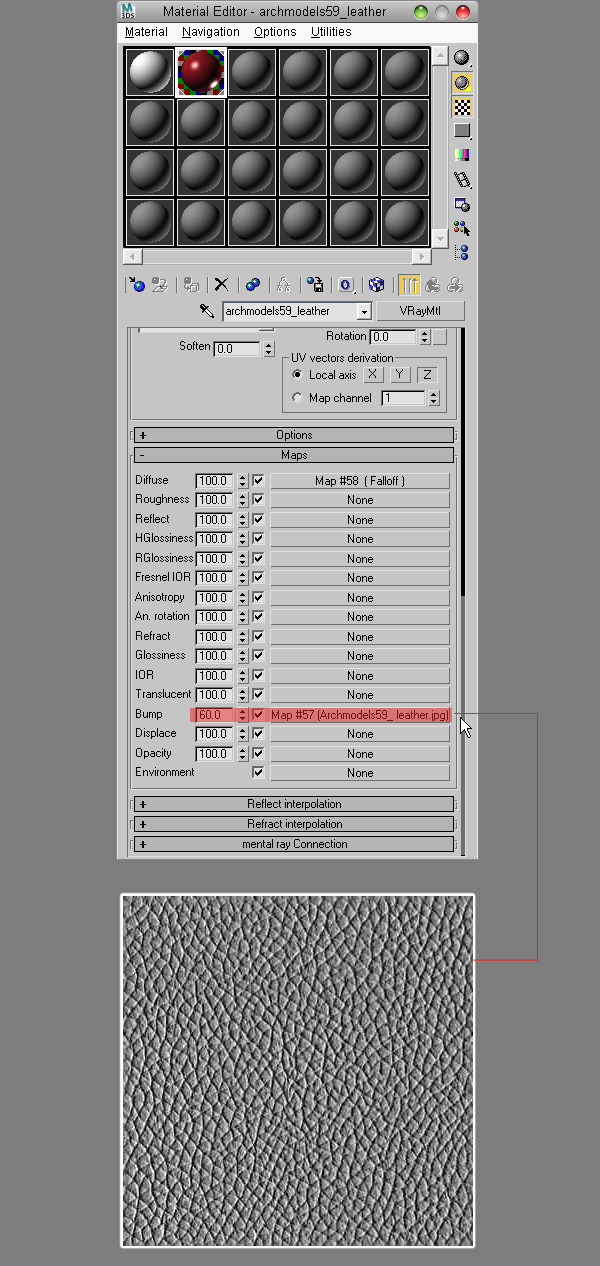
Bump mapping makes an object appear to have a bumpy or irregular surface. When you render an object with a bump-mapped material, lighter (whiter) areas of the map appear to be raised, and darker (blacker) areas appear to be low.
Fresnel Reflections – Checking this option makes the reflection strength dependent on the viewing angle of the surface. Some materials in nature (glass etc) reflect light in this manner.
Max Depth – The number of times a ray can be reflected. Scenes with lots of reflective and refractive surfaces may require higher values in order to look right.
Exit Color – If a ray has reached its maximum reflection depth, this color will be returned without tracing the ray further.
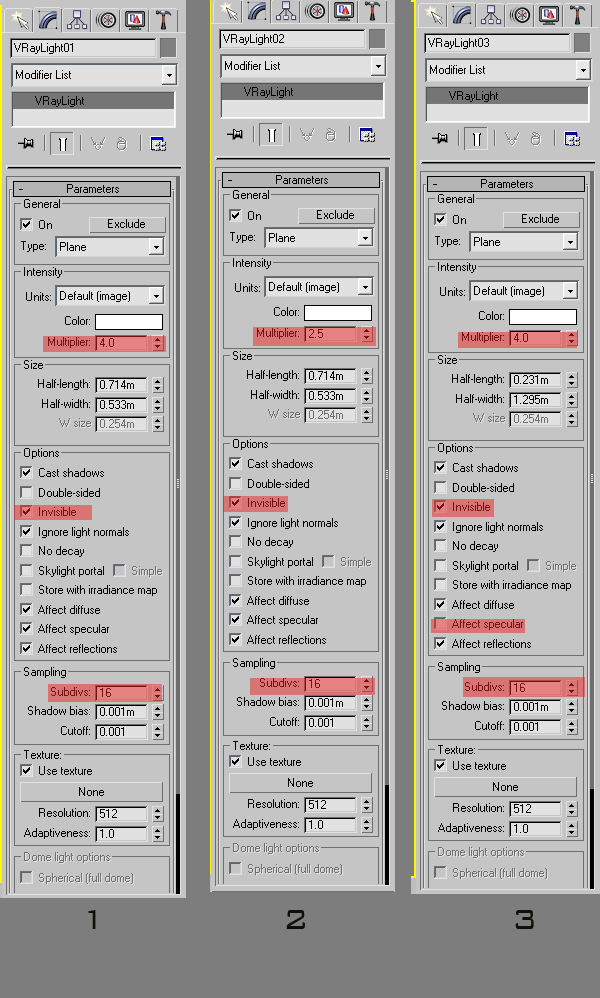
Color – The color of the light.
Multiplier – The multiplier for the light color. Also the light intensity is adjusted by the Intensity units parameter.
Invisible – This setting controls whether the shape of the VRayLight source is visible in the render result. When this option is turned on, the source is rendered in the current light color. Otherwise it is not visible in the scene.
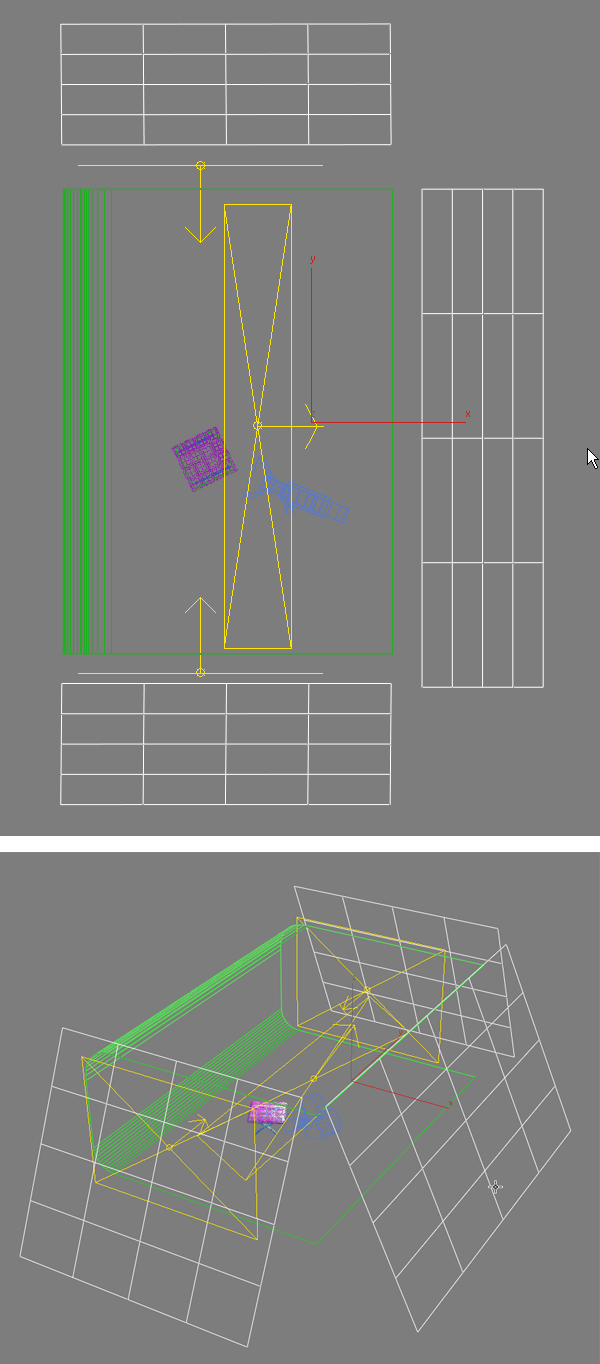
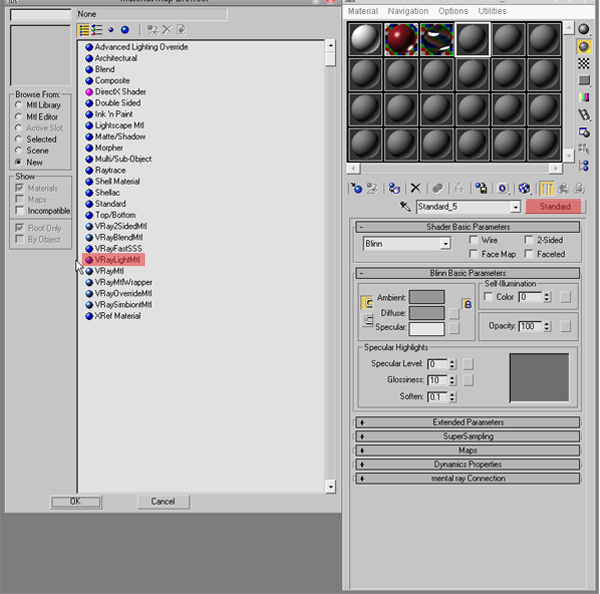
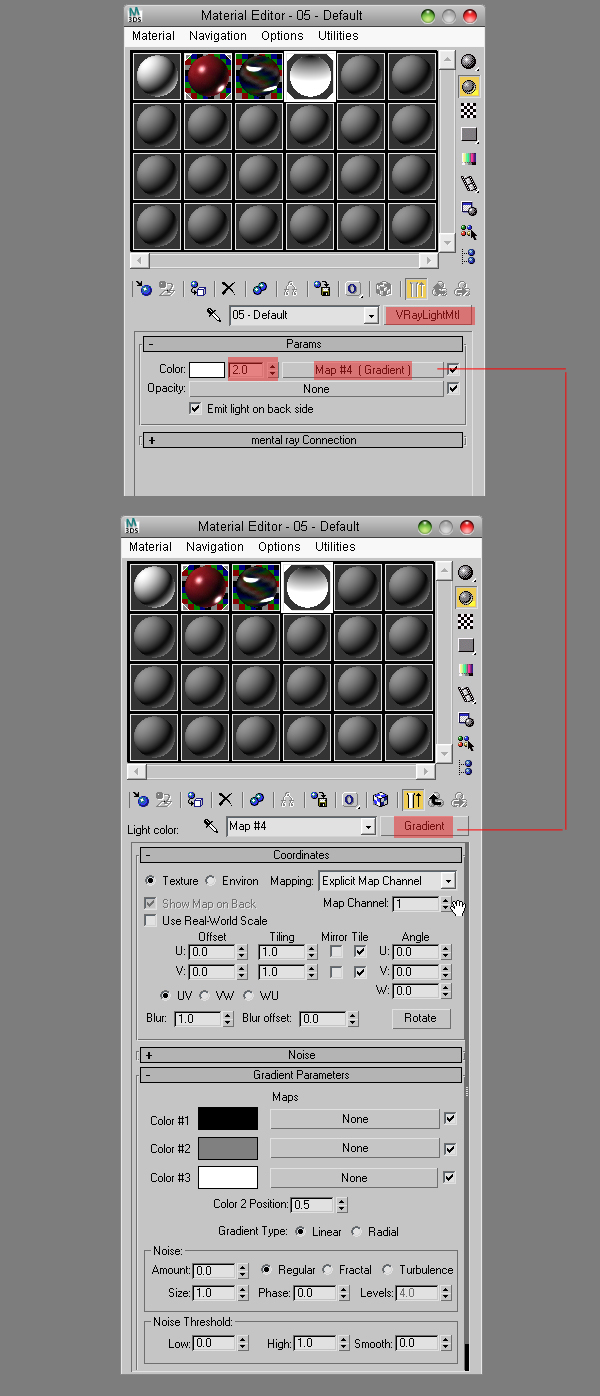
VRayLightMtl – A special material provided with the V-Ray renderer. This material is used for producing self-illuminated surfaces, and allows faster rendering than a Standard 3ds Max material with self-illumination enabled. It also allows you to turn an object into an actual mesh light source.
Color – The self-illumination color of the material.
Multiplier – The multiplier for the Color.
uncheck “Default Lights”. “Default Lights” allow you to control the default lights in the scene.
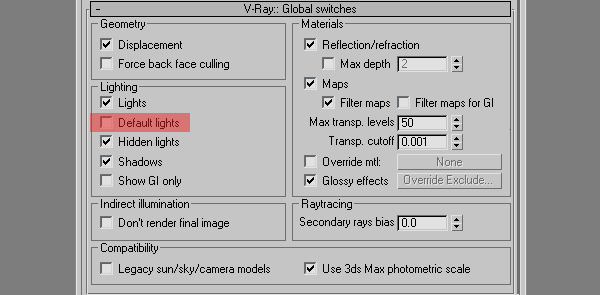
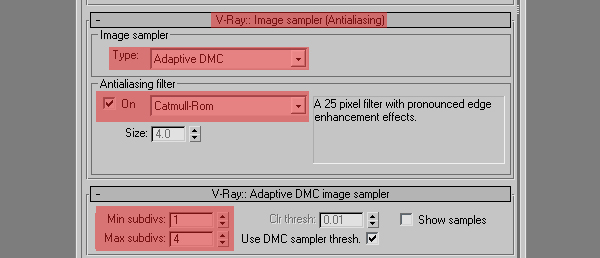
Image Sampler – An algorithm for sampling and filtering the rendered image.
Fixed – Always takes the same number of samples per pixel.
Adaptive DMC – Takes a variable number of samples per pixel, depending on the difference in the intensity of the pixels.
Adaptive Subdivision – Divides the image into an adaptive grid-like structure, and refines depending on the difference in pixel intensity.

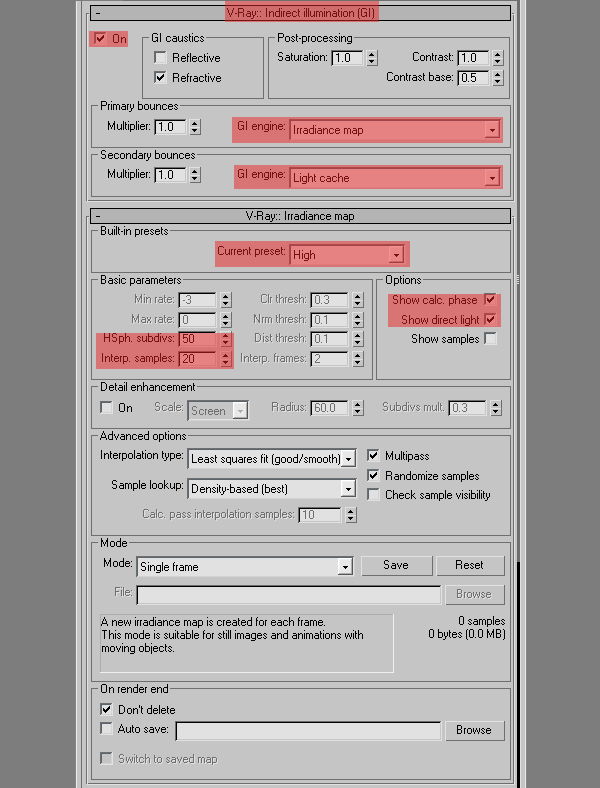
Also, change the preset to “High hsph”, the “Subdivs” to 50, and the “Interp Samples” to 20. Below is a description of the important settings:
Irradiance map – Computes the indirect illumination only at some points in the scene, and interpolates for the rest of the points. This is very fast compared to direct computation, especially for scenes with large flat areas.
Current Preset – this dropdown list allows you to choose from several presets for some of the irradiance map parameters.
Hemispheric Subdivs (HSph. subdivs) – Controls the quality of the individual GI samples. Smaller values make things faster, but may produce a blotchy result. Higher values produce smoother images.
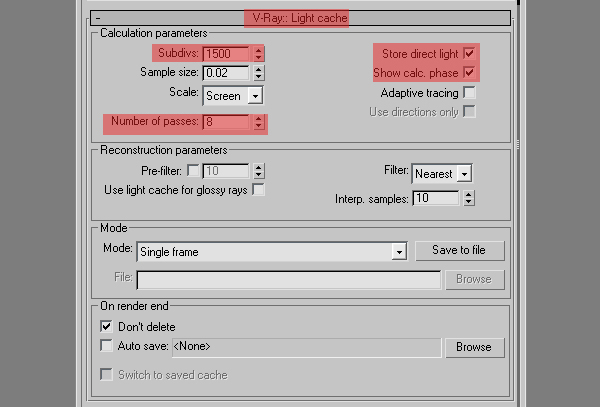
Light Cache – The light map is built by tracing many eye paths from the camera. Each of the bounces in the path stores the illumination from the rest of the path into a 3d structure. This is very similar to a photon map.
Subdivs – Determines how many paths are traced from the camera. The actual number of paths is the squared value of the subdivs (the default 1000 subdivs mean that 1 000 000 paths will be traced from the camera.
Number of Passes – The light cache is computed in several passes, which are then combined into the final light cache. Each pass is rendered in a separate thread independently of the other passes. This ensures that the light cache is consistent across computers with a different number of CPUs. In general, a light cache computed with a smaller number of passes may be less noisy than a light cache computed with more passes for the same number of samples. However, a small number of passes cannot be distributed effectively across several threads.
This tutorial is divided in 4 parts: Scene setup, materials, lighting, and rendering. In the first part, we will set up the scene, create a base, and import our models, in the second part, we will be assigning materials and using Vray lights to light our scene, and in the last part, we will adjust the Vray settings for the final render.
Note: This is a lighting and rendering tutorial. You will need to supply your own model in order to follow along.
Click on

Step 1
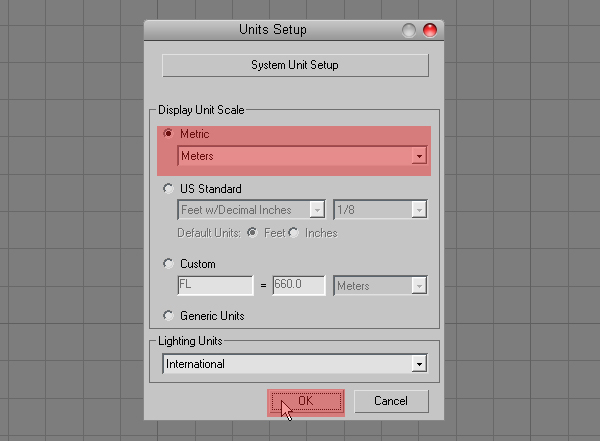
Open 3ds Max and set our scene units to meters by going to “Customize>Unit Setup>Metric>Meters.
Step 2
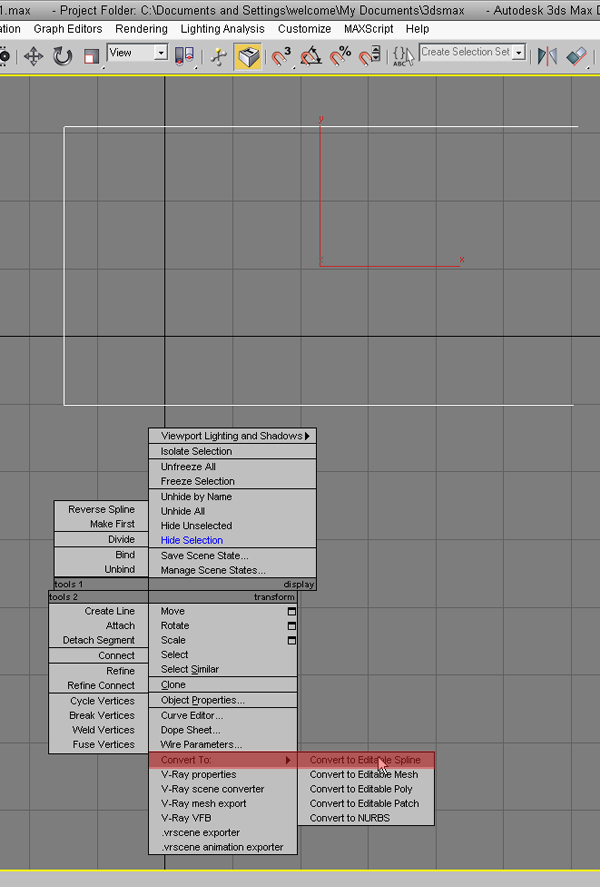
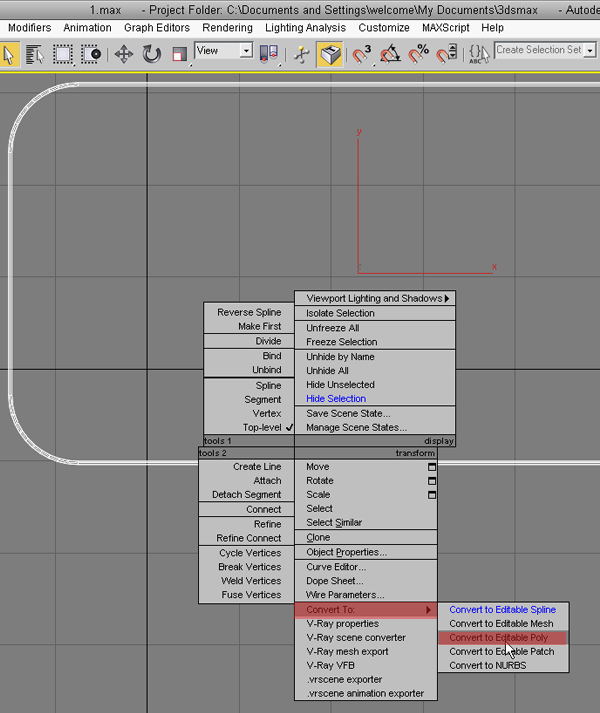
Now lets create an environment for our scene. Create a “C” shape with the line tool and convert it to an editable spline.
Step 3
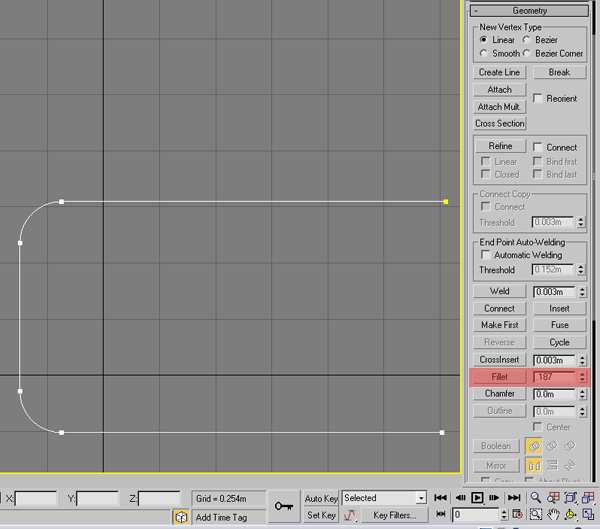
Select the corner points and choose “Fillet” with a .187m value. Also, set the “Interpolation Steps” to 10.
Step 4
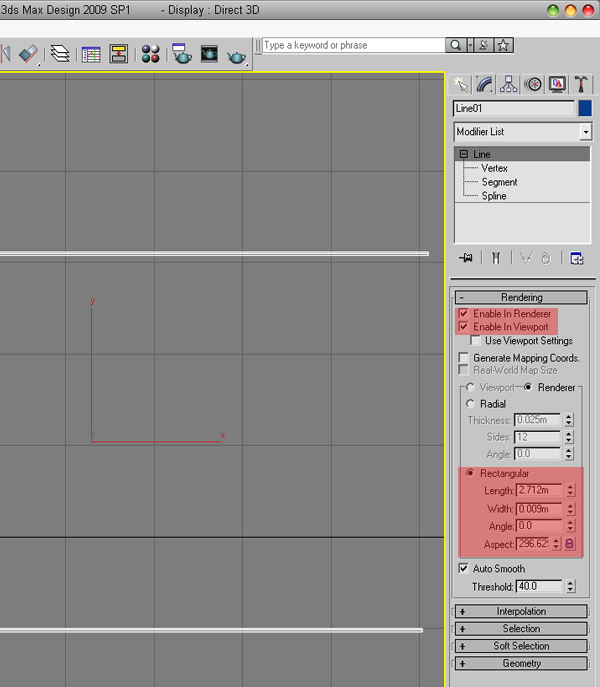
Select the line again, and in the rendering tab, check “Enable in Viewport” and “Enable in Renderer”. Select “Rectangular” for the type, and enter the values shown below.
Step 5
Now convert the line to an editable poly, and your base for the lighting setup is done.
Step 6
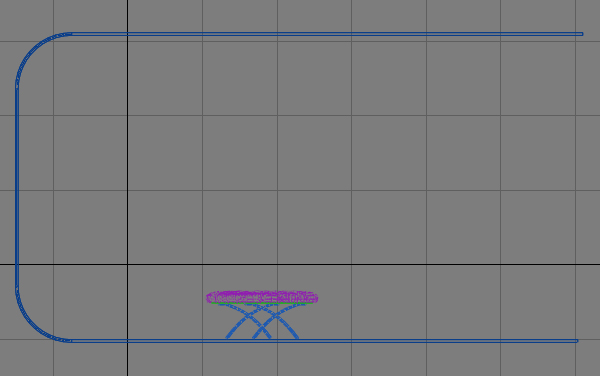
Import or merge your model, and scale it according to the size of the base. In my case i am importing a furniture model.
Step 7
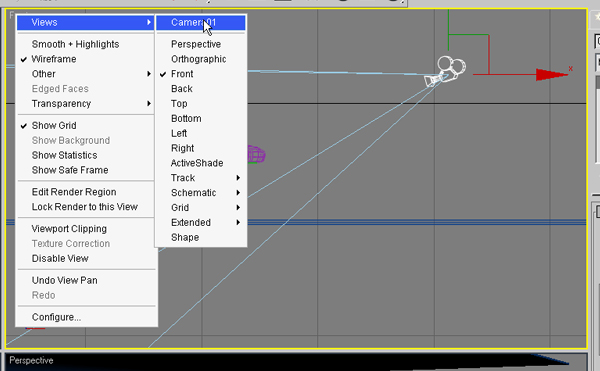
Create a free camera in the front view. Now, click on the top left side of the view port, go to views, and select the camera view.
Step 8
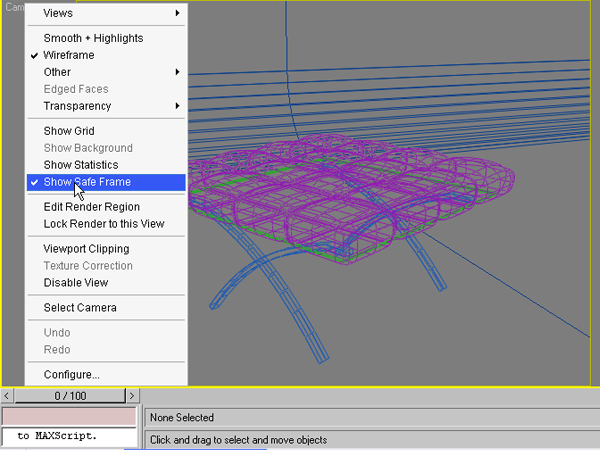
Enable the safe frame, and adjust the camera according to your scene and model.
Step 9
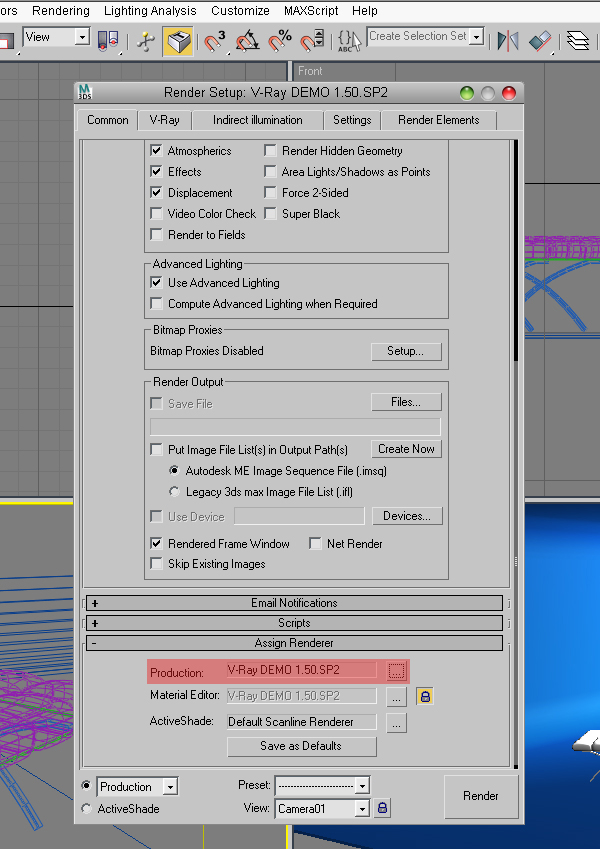
Press f10, and under production, choose Vray from the assign renderer tab. This will enable Vray as your renderer, and also enable Vray materials in the material editor.
Step 10
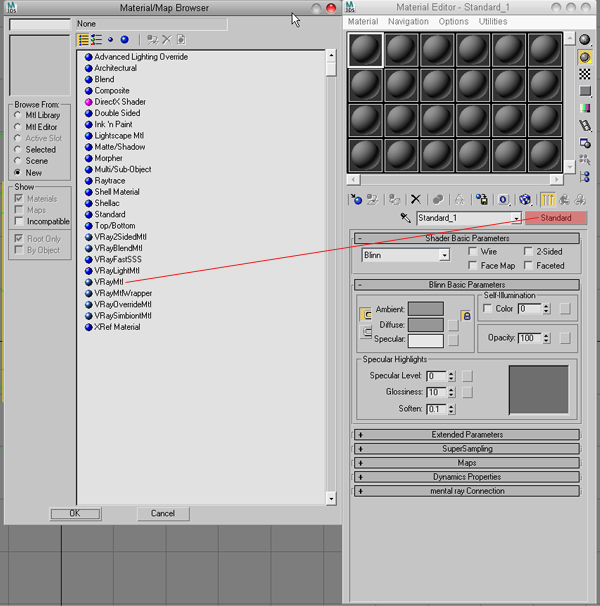
Press ‘M’ to open the material editor, then click standard, and then Vray mtl. The VRayMtl is provided with the V-Ray renderer. This allows for physically correct illumination in the scene, faster rendering, and more convenient reflection and refraction parameters.
Step 11
Click on the diffuse color and make it pure white and apply it to the base. This will help in bringing out the details andgetting diffuse reflections.

Step 12
Now lets texture the upper part of the stool. The basic parameters that will be used in the material are:Apply a fall off map in the Diffuse slot (as you can see in the image). Also change the reflect color and bring down the reflect glossiness to .7 Apply this material to the cushion of the stool. Note: You will need to adjust the colors and various settings described to suit your own model.


Step 13
Now add a bump map, with a bump value of 60, in the maps area of the same material.Bump mapping makes an object appear to have a bumpy or irregular surface. When you render an object with a bump-mapped material, lighter (whiter) areas of the map appear to be raised, and darker (blacker) areas appear to be low.

Step 14
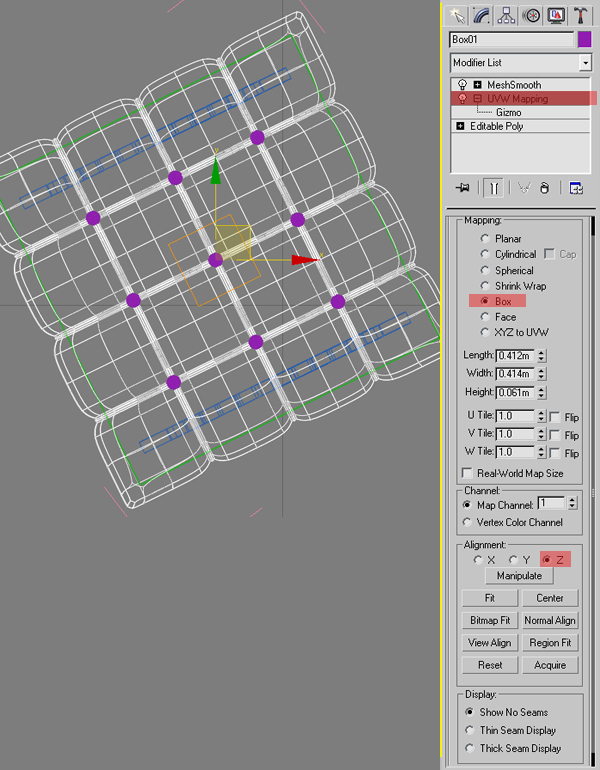
Apply a UVW map modifier on just the cushion, and select box as the type of mapping style. Also, scale the gizmo so that it can fit the bump map properly.
Step 15
Time to create the shader for the metallic legs and the base of the stool. Here are the important parameters you will need to adjust:
Step 16
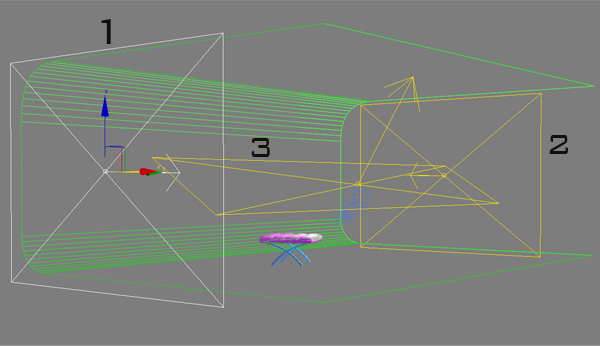
Now create 3 Vray lights in the scene. Change the multiplier, the color to white, and check invisible. The important parameters you should know are:

Step 17
Create a simple plane, rotate it as shown, and apply a Vray light material to it. Add a gradient map on the Vray light material, and set the intensity of this material to 2.


Step 18
The following steps will be dedicated to the render settings for Vray. Press F10, and under “Global Switches”,uncheck “Default Lights”. “Default Lights” allow you to control the default lights in the scene.

Step 19
For the “Image Sampler” type select “Adaptive DMC”, and “Catmull/Rom” as the filter. Also, change the “Min” and “Max Subdivs”. Here is a description of the important settings:
Step 20
Under the “Environment” tab, check on “GI Override”, which will allow you to override the 3ds Max Environment settings for indirect illumination calculations. The effect of changing the GI environment is similar to that of a skylight.
Step 21
Under “Indirect Illumination”, select “Irradiance Map”, and “Light Cache” as the “Primary” and “Secondary Engine”.Also, change the preset to “High hsph”, the “Subdivs” to 50, and the “Interp Samples” to 20. Below is a description of the important settings:

Step 23
For the “Light Cache” set the “Subdivs” to 1500, and for “No of Passes” set the value to 8.
Step 24
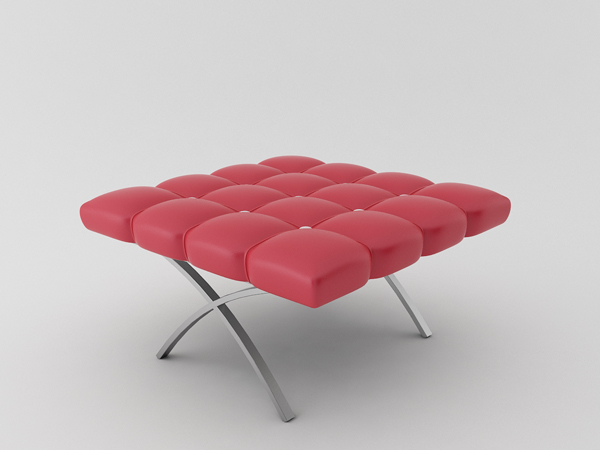
Hit render, and you’re done. You have just created your first studio render !!
Step 1
Open 3ds Max and set our scene units to meters by going to “Customize>Unit Setup>Metric>Meters.
Step 2
Now lets create an environment for our scene. Create a “C” shape with the line tool and convert it to an editable spline.
Step 3
Select the corner points and choose “Fillet” with a .187m value. Also, set the “Interpolation Steps” to 10.
Step 4
Select the line again, and in the rendering tab, check “Enable in Viewport” and “Enable in Renderer”. Select “Rectangular” for the type, and enter the values shown below.
Step 5
Now convert the line to an editable poly, and your base for the lighting setup is done.
Step 6
Import or merge your model, and scale it according to the size of the base. In my case i am importing a furniture model.
Step 7
Create a free camera in the front view. Now, click on the top left side of the view port, go to views, and select the camera view.
Step 8
Enable the safe frame, and adjust the camera according to your scene and model.
Step 9
Press f10, and under production, choose Vray from the assign renderer tab. This will enable Vray as your renderer, and also enable Vray materials in the material editor.
Step 10
Press ‘M’ to open the material editor, then click standard, and then Vray mtl. The VRayMtl is provided with the V-Ray renderer. This allows for physically correct illumination in the scene, faster rendering, and more convenient reflection and refraction parameters.
Step 11
Click on the diffuse color and make it pure white and apply it to the base. This will help in bringing out the details andgetting diffuse reflections.

Step 12
Now lets texture the upper part of the stool. The basic parameters that will be used in the material are:Apply a fall off map in the Diffuse slot (as you can see in the image). Also change the reflect color and bring down the reflect glossiness to .7 Apply this material to the cushion of the stool. Note: You will need to adjust the colors and various settings described to suit your own model.


Step 13
Now add a bump map, with a bump value of 60, in the maps area of the same material.Bump mapping makes an object appear to have a bumpy or irregular surface. When you render an object with a bump-mapped material, lighter (whiter) areas of the map appear to be raised, and darker (blacker) areas appear to be low.

Step 14
Apply a UVW map modifier on just the cushion, and select box as the type of mapping style. Also, scale the gizmo so that it can fit the bump map properly.
Step 15
Time to create the shader for the metallic legs and the base of the stool. Here are the important parameters you will need to adjust:
Step 16
Now create 3 Vray lights in the scene. Change the multiplier, the color to white, and check invisible. The important parameters you should know are:

Step 17
Create a simple plane, rotate it as shown, and apply a Vray light material to it. Add a gradient map on the Vray light material, and set the intensity of this material to 2.


Step 18
The following steps will be dedicated to the render settings for Vray. Press F10, and under “Global Switches”,uncheck “Default Lights”. “Default Lights” allow you to control the default lights in the scene.

Step 19
For the “Image Sampler” type select “Adaptive DMC”, and “Catmull/Rom” as the filter. Also, change the “Min” and “Max Subdivs”. Here is a description of the important settings:
Step 20
Under the “Environment” tab, check on “GI Override”, which will allow you to override the 3ds Max Environment settings for indirect illumination calculations. The effect of changing the GI environment is similar to that of a skylight.
Step 21
Under “Indirect Illumination”, select “Irradiance Map”, and “Light Cache” as the “Primary” and “Secondary Engine”.Also, change the preset to “High hsph”, the “Subdivs” to 50, and the “Interp Samples” to 20. Below is a description of the important settings:

Step 23
For the “Light Cache” set the “Subdivs” to 1500, and for “No of Passes” set the value to 8.
Step 24
Hit render, and you’re done. You have just created your first studio render !!
No comments:
Post a Comment